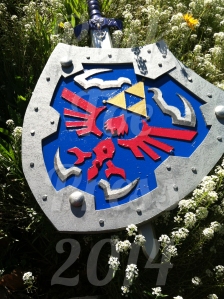
This is Step Three of Three in a tutorial to make your own Hylian Shield from the Legend of Zelda series. If you would like to start at the beginning, please follow this link to PART ONE.
If you recall, we just finished adding all the hardware and detailing to the shield. A lot of the detail we added has a functional purpose too. Now it is time to add the finishing touches to really make this Hylian Shield look fit for the Hero of Hyrule!
Step 9A: Painting the shield. Now this is where everything comes together. You CAN prime the shield first, but as I am impatient and since the foam-core I was using is white, I decided to bypass that step. Get yourRust-oleum “Hammered” silver spray paint and go to a well ventilated area (outside). I chose to spray the back of the shield first, just incase anything happened.
Looks pretty good to me!
I had no issues with the paint. I was mindful not to get much paint close to the edges of the foam-core as it has a tendency to eat through styrofoam. I had very little corrosion on this project, but please bear that in mind. The only place were a little touch-up was needed was underneath the wooden buttons. For this, I used my Martha Stewart’s High Gloss Acrylic Paints in SILVER.
You (almost) can’t see the little crescent of silver paint.
I know it is hard, but you WILL want to wait at least a few hours between coats of paint. I let mine dry overnight before painting the front of the shield. The Hammered spray paints seem to take a little extra time to dry without becoming tacky. But once the back of the shield is dry, take it outside to add a coat of silver to the front of the shield. This looks awesome when painted.
Maybe I’ll just leave it like this…
If you notice any spots on the front of the shield that need a touch-up. As we will be painting most of the interior of the shield a different color anyway, you may not need to do any touch-up work with the silver paint at all. I would double check near the wooden buttons and the edges. This may be a good time to use your SILVER ACRYLIC paint to do a coat around the edges. Allow all paint to dry.
Step 9B: Painting the shield with Acrylics is the last big step. The High Gloss colors I used on the shield were: Habanero, Beetle Black, and Indigo. The Metallic colors I used were: Gold, Yellow Gold, and Sterling (silver). I chose to start with the blue part of the shield.
Use a fine detailing brush to get in those tough corners.
You may need to do several coats in some places. I found the blue did not cover the silver completely in certain areas. Once the blue paint has dried completely, move on to red and then gold. If you are using the same brushes, be sure to thoroughly clean them between colors.
Before the detailing on the silver areas.
For the back of the shield and for the silver detailing on the front, I mixed the silver paint with a little bit of black paint to make a dark silver color.
 After. Doesn’t it look better?
This is an optional step, but I found it really added depth to the shield. You really only need a little bit for the front, but I would suggest making a couple Tablespoons worth of dark silver for the back of the shield. I used a 1-inch brush to apply the dark silver paint to the recessed area on the back of the shield. While waiting for the paint to dry, go fetch your fabric/felt and embroidery thread. Also grab some scrap pieces of foam-core and some more brads.
Step 10: Adding the finishing touches. Now that the painting is done, there is little left for us to do. The finishing touches include adding a strap to the back of the shield to keep it close to your arm, and minimal detailing on the handle. Let’s start with the arm strap!
For the arm strap you will need a long piece of felt. Mine was about 8.5 inches by 2 inches. If your arm is bigger or smaller, you may need to adjust the size. You will also need to cut two pieces of foam-core from your scraps. These pieces will be used to secure the strap to the shield.
Glue the foam-core and felt together with the foam-core on top. Take the furniture nail/tack and push it through the foam-core and into the fabric close to the base of the scallop shape. The tack should have enough room left to be pressed into the back of the shield. Do this for the other side of the strap. Take both ends and press into the shield approximately 5 inches apart. Note where the tack makes a mark and apply glue to that area. Glue both ends and apply pressure (lay a book on top) and let dry. Once dry, take a brad (they are longer than the tacks) to opposite ends of the piece of foam-core and press into the shield. This will add extra strength to the strap. Allow to dry completely before use.

The arm strap and the handle being finished.
While you are waiting on the straps to dry, take your two embroidery flosses. Wrap them around the handle and cover the center of the handle completely (see above photograph). Overlap slightly and use glue to secure the loose ends.

You can see how the detailing really makes the shield come to life!
Step 11: Take a step back and admire your handiwork!!!
That’s it! You’re FINISHED!


1 thought on “How to make your own DIY Hylian Shield Tutorial PART THREE”